Routers from INSYS icom can act as OpenVPN clients and establish an OpenVPN connection to an external OpenVPN system. This means, for example, that a direct marketing provider can be granted access to a device within the installation.
Situation
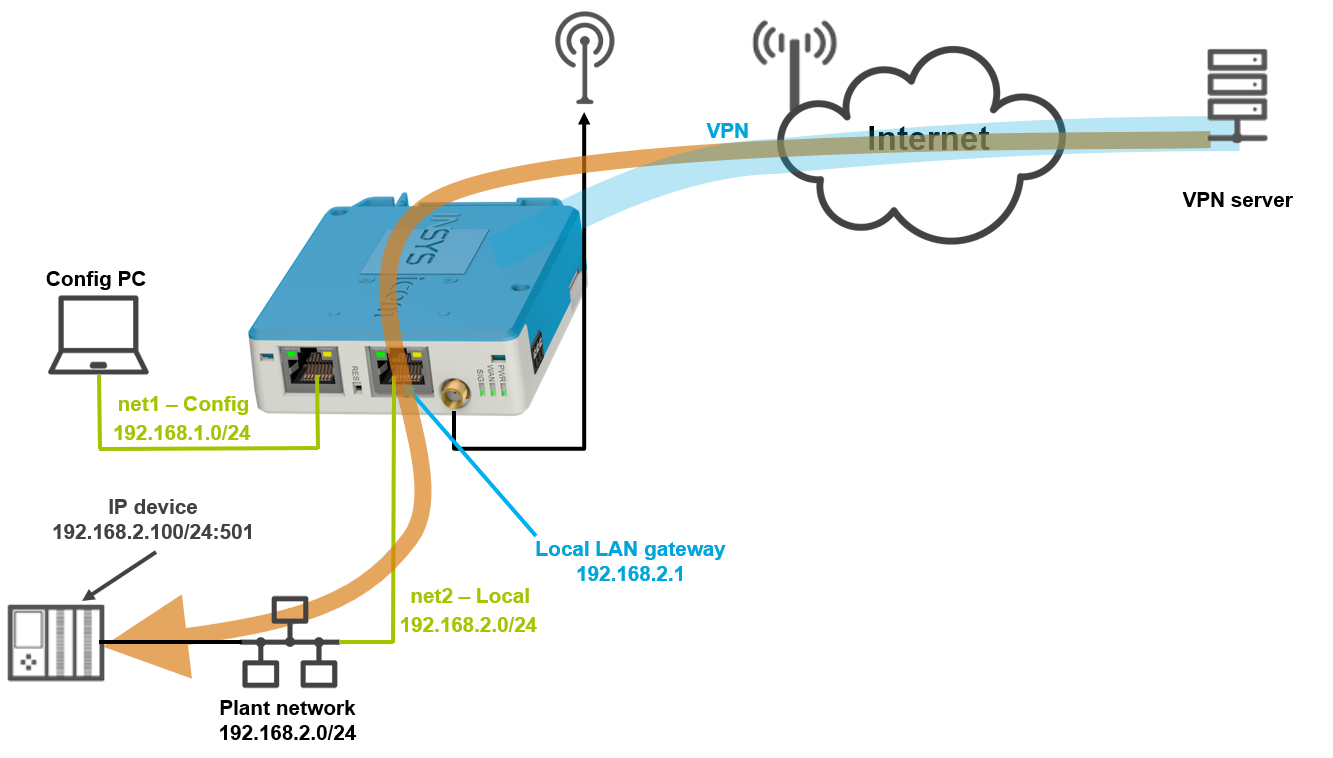
A device on the network behind the router is to be made accessible to a direct marketing provider via its OpenVPN network.
Solution
Configure the router to connect to the direct marketing provider's OpenVPN network and set up port forwarding to the device you wish to access.
It is assumed that you have access to the router’s user interface and that the router is configured for a WAN connection and a LAN connection to the local network (e.g. using the Startup wizard).
In addition, the VPN server operator must set up the necessary access requirements. They will usually provide the required certificates and keys (in the file formats .crt, .key, .p12, .ta or .pfx) as well as an OpenVPN configuration file (in the file formats .conf or *.ovpn).
Security requirements for certificates!
The certificates must use a signature algorithm of SHA256 or higher.
Converting the configuration file
A converter tool (for Windows) is available for converting the OpenVPN configuration file into an ASCII configuration file for an INSYS router. The ASCII configuration file is then imported into the router to add the OpenVPN client configuration to the existing configuration.
Installing the converter tool
Download the OpenVPN to icom OS Converter from our support tools download page and extract the file to a folder on your computer.
The file is an executable file that can be launched directly from the directory. In some environments, a warning about software from unknown sources may appear. In this case, you can ignore this warning and run the tool anyway.
Creating the ASCII configuration file
Start the converter tool.
Open the OpenVPN configuration file in a text editor.
Check whether the file contains any lines beginning with # or ; and delete them if necessary.
Upload the OpenVPN configuration file in the File Selection section under Select an OpenVPN file.
If the certificates and keys are not included in the OpenVPN configuration file, upload them as follows:
Check the Additional files checkbox and choose between Use individual certificates (if you have individual certificate files) and Use PKCS#12 (if the certificates are contained in a PKCS#12 container).
Upload the individual certificates or the container into the relevant fields.
If the OpenVPN server uses a static key for encryption (crypt) or for authentication only (auth), check the Use TLS-auth/crypt checkbox and upload the key.
In the Interface Settings section, under OpenVPN interface name, enter a descriptive name – for example, the name of the direct marketing provider – under which this OpenVPN interface is to be created in the router’s configuration.
Select the router’s IP network interface that is connected to the local network to which you wish to connect via the OpenVPN connection.
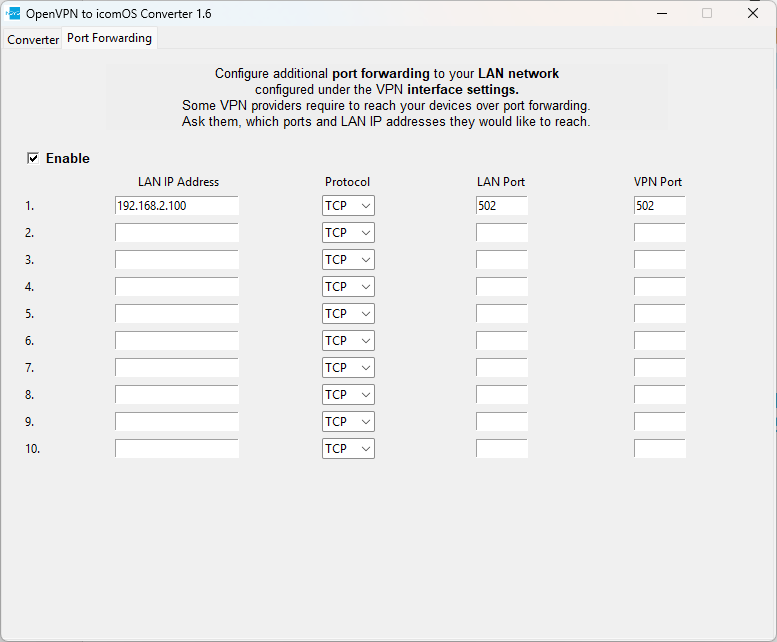
In the converter tool, change to the Port Forwarding tab and check the Enable checkbox.
In the first row, enter the IP address of the device on your plant network to which you wish to grant access in the LAN IP address column.
Protocol, LAN Port and VPN Port are set for a typical Modbus TCP application, as used by most direct marketing providers. Adjust these if necessary should you have been provided with different values by your direct marketing provider.
Change back to the Converter tab.
Click on Convert.
The tool creates an ASCII configuration file named icom_os_openvpn_profile.txt, which is saved in the tool’s directory.
Configuring the router
Open the user interface of the router in a browser: https://insys.icom
Click in the Administration → Profile menu in the ASCII-Konfiguration section on and upload the ASCII configuration file created using the converter tool.
Click in the list in the ASCII Configurations section on the line of above uploaded ASCII configuration file on and select Apply ASCII configuration.
Click on Apply ASCII configuration.
Activate the profile with a click on Activate profile .
Functional test
Open the  Status → Dashboard page and observe on the WAN chain section the establishment of the WAN chain containing the OpenVPN tunnel.
Troubleshooting
The status of the WAN chain and its interfaces is displayed in the user interface on the
Status → Dashboard page. If an interface fails to reach the online status, its status can also be checked on this page.If no network traffic is established, the debugging tools of the router can be used.
Check on the
Status → Log view page the messages in the OpenVPN log.If the OpenVPN connection is established but the direct marketing provider cannot access the device, check on the
Status → Dashboard → Firewall → Status page whether the byte and packet counter counts of for the NAT rules. If not, the direct marketing provider may use a different port to access the system; if so, please update this in both the destination NAT rule and the firewall rule.Disable on the Network → Firewall / NAT page in the IP filter settings section the IP filters for IPv4 to find out whether incorrect filter settings are the cause of connection problems.