The icom Data Suite is a Device App for installation on an INSYS router with icom OS.
It is a comprehensive, flexible and scalable software package for the interconnection of data points with an INSYS router.
Situation
The icom Data Suite for INSYS routers with icom OS is running in a container that only needs to be uploaded to the router and configured. The container will be supplied in form of an update packet. It can be downloaded here, on our Release Notes site and from our icom Data Suite Update Server.
The icom Data Suite requires a valid licence with the respective activated functionality after installation. An overview of the different licences with and without costs as well as the possibility for purchase is available on our Website. Without a license file, you have full access to the configuration, but some features will not be functional. Starting with version 1.12 of the icom Data Suite, it is possible to start a free trial period. All functions of the icom Data Suite are available without any restrictions until expiry of this test period.
Solution
It is recommended to commission the router as suggested in the Quick Installation Guide. Different settings of the router may result in necessary adjustments of the settings described in the following.
The following describes the installation via the installation wizard, which makes the installation of the icom Data Suite very easy, as well as the manual installation.
It is prerequisite that you have access to the user interface of the router.
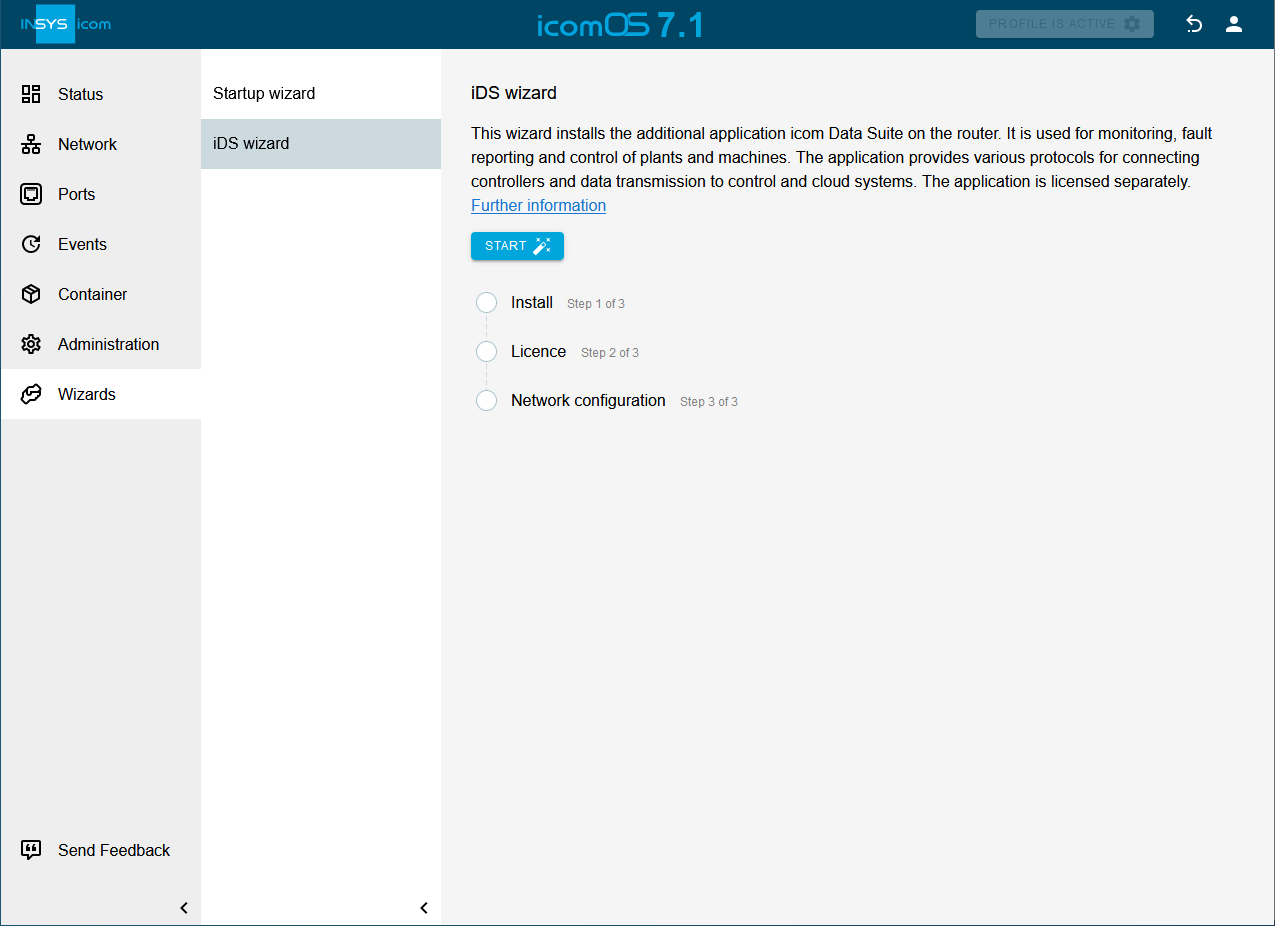
Installing the icom Data Suite using the installation wizard
It is prerequisite that you have Internet access. If you already have a licence package, this must be stored on your computer.
Open the user interface of the router: https://insys.icom
Click in the Wizards → iDS wizard menu on START .
Click on DOWNLOAD FROM THE INTERNET, to download the icom Data Suite from the Update Server.
You may also upload the icom Data Suite packet under Upload iDS container if you have downloaded it to your computer before.
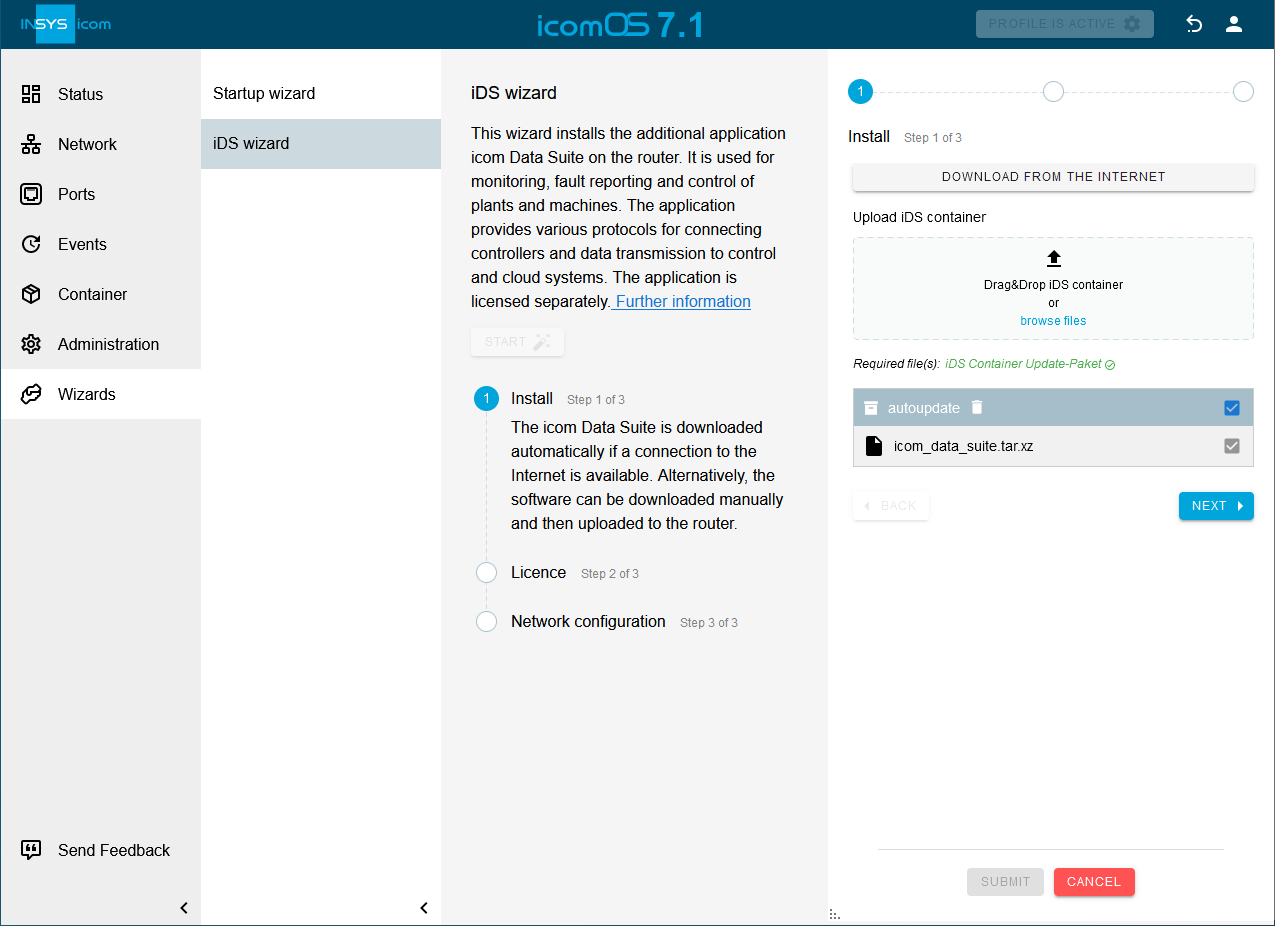
Click on NEXT .
Select Upload Licences and upload your licence package or select Start trial period if you do not yet have a licence package.
Please note!
The licence package of the icom Data Suite has a file name such as ids_licence_<s/n>.tar, e.g. ids_licence_12345678.tar
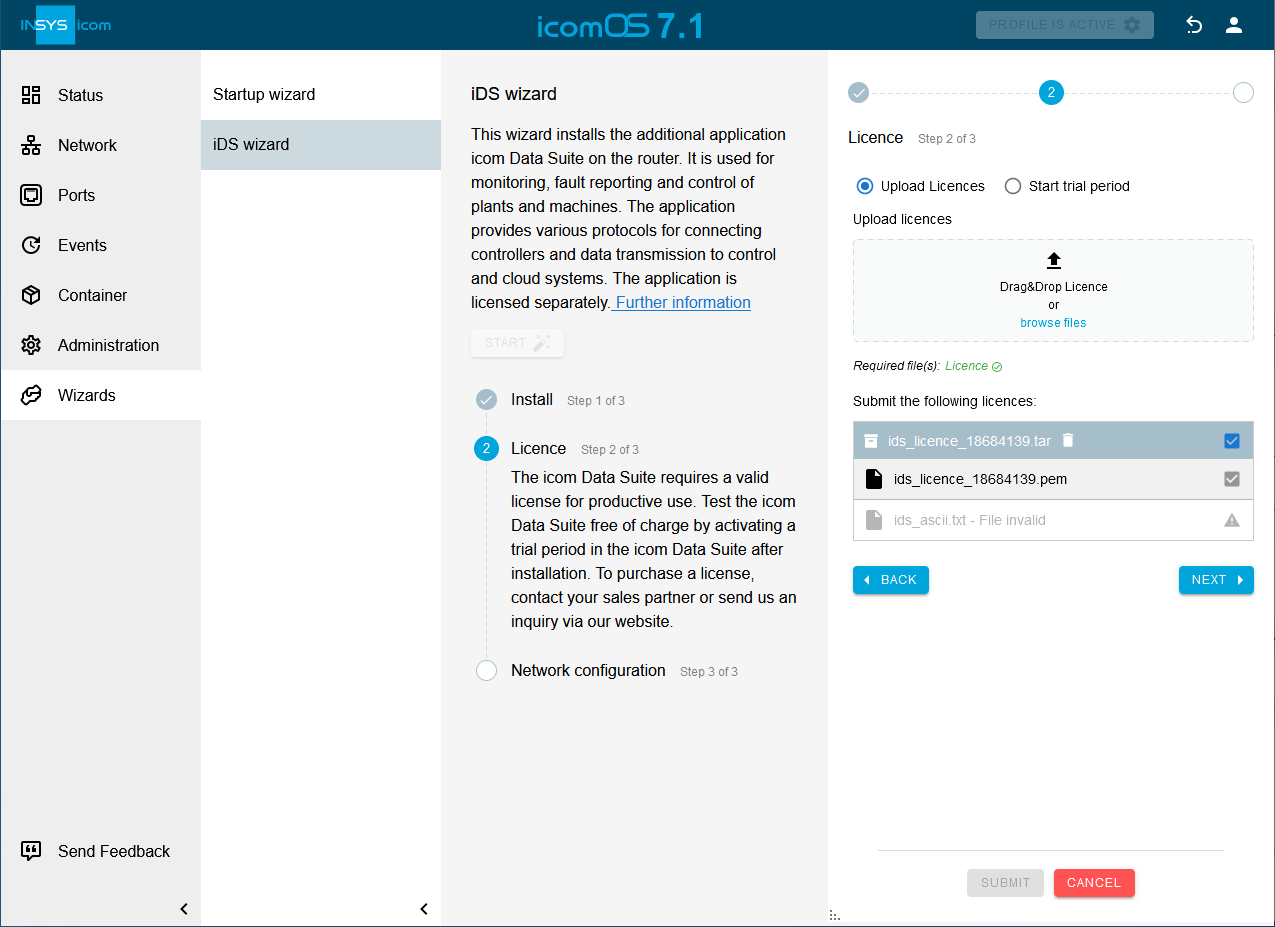
Click on NEXT .
[Optional] Adjust the IP address under which the icom Data Suite will be accessible or create even more IP addresses for the icom Data Suite.
Click on SUBMIT.
Click on FINALIZE to complete the installation wizard.
Click on the address link in the installation wizard to open the icom Data Suite in the browser.
Please note!
If access takes place via HTTPS and no CA certificate of INSYS is installed in the browser, it might be necessary to make an exception in the browser here.
User name: insys (default)
Password: icom (default)
Open the Status → Licence menu of the icom Data Suite to verify your licence.
You have now installed the icom Data Suite and, if applicable, the corresponding licence on your router.
Installing the icom Data Suite manually
It is prerequisite that the icom Data Suite packet is stored on your computer. If you already have a licence package, this must be stored on your computer.
Open the user interface of the router: https://insys.icom
Click in the
 Container → Container menu on and select the container package of the icom Data Suite.
Please note!
The Data Suite update package has a file name such as ids_<version>.tar, e.g. ids_1.0.tar
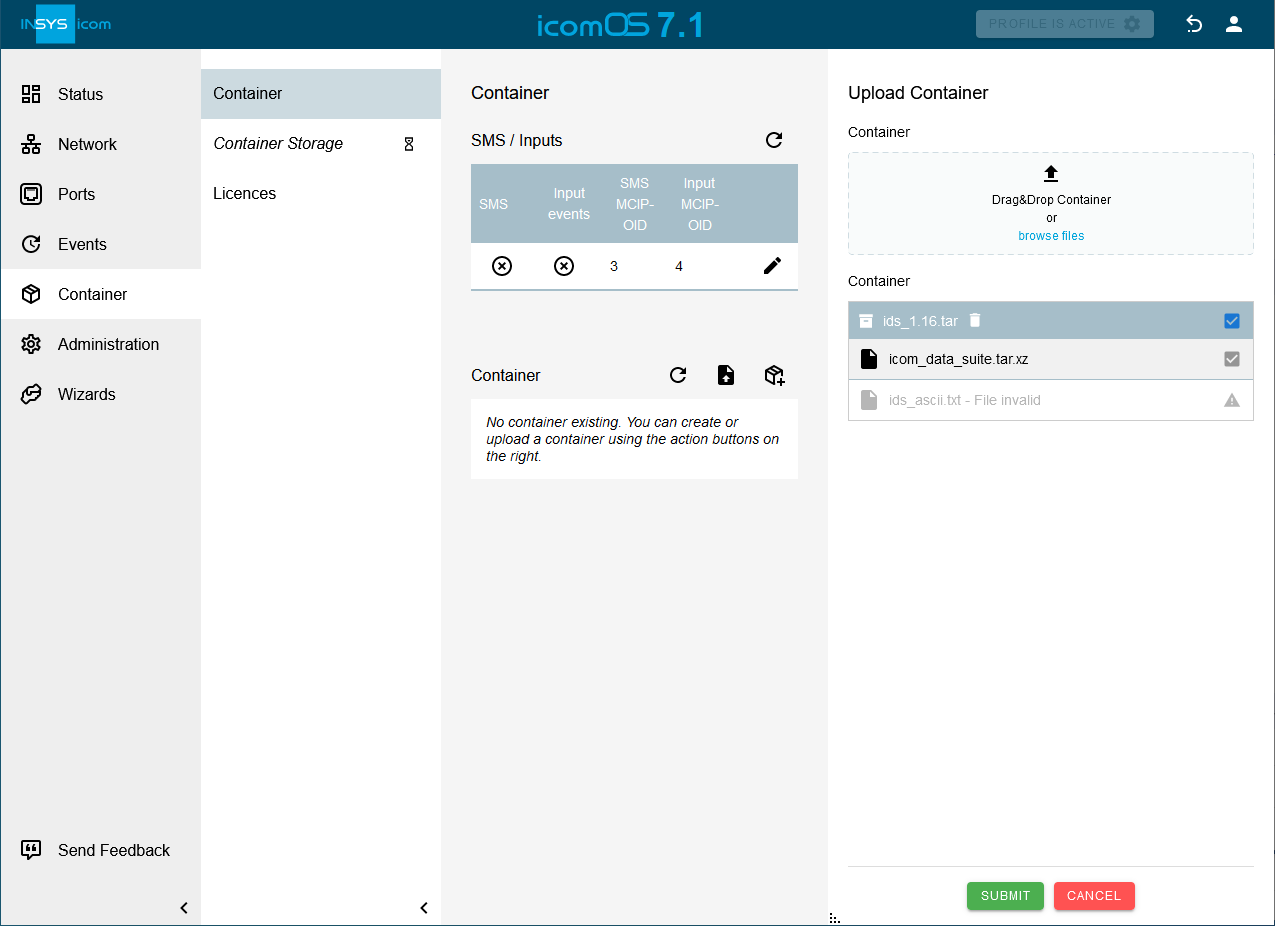
Click on SUBMIT.
The container will be imported. The script contained in the container package will take care that the container is being installed.[Optional - if you already have a licence package] Click in the
Container → Licences manu on and select the licence package.Please note!
The licence package of the icom Data Suite has a file name such as ids_licence_<s/n>.tar, e.g. ids_licence_12345678.tar
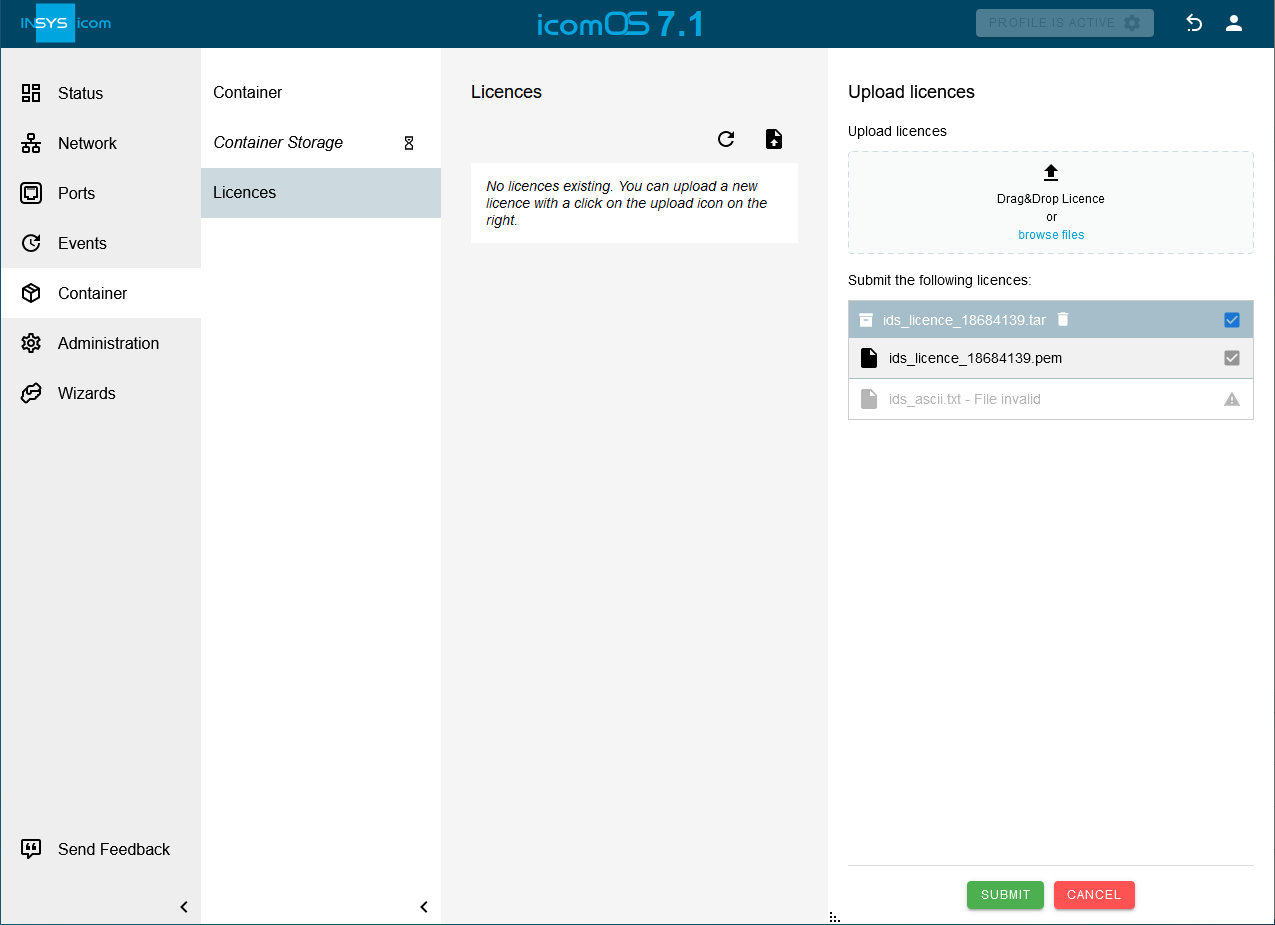
Click on SUBMIT.
The licence will be imported.Click in the
Container → Container menu in the Container section in the row of the container of the icom Data Suite on  and configure the container:
Licence: select the licence uploaded in the last step if available
User group for CLI without authentication: Read/Write (for access of the icom Data Suite to the CLI of the router)
Bridge to IP net: select the IP net in which the icom Data Suite is to be accessible.
Ipv4 address / Netmask: enter the IP address under which the icom Data Suite is to be accessible.
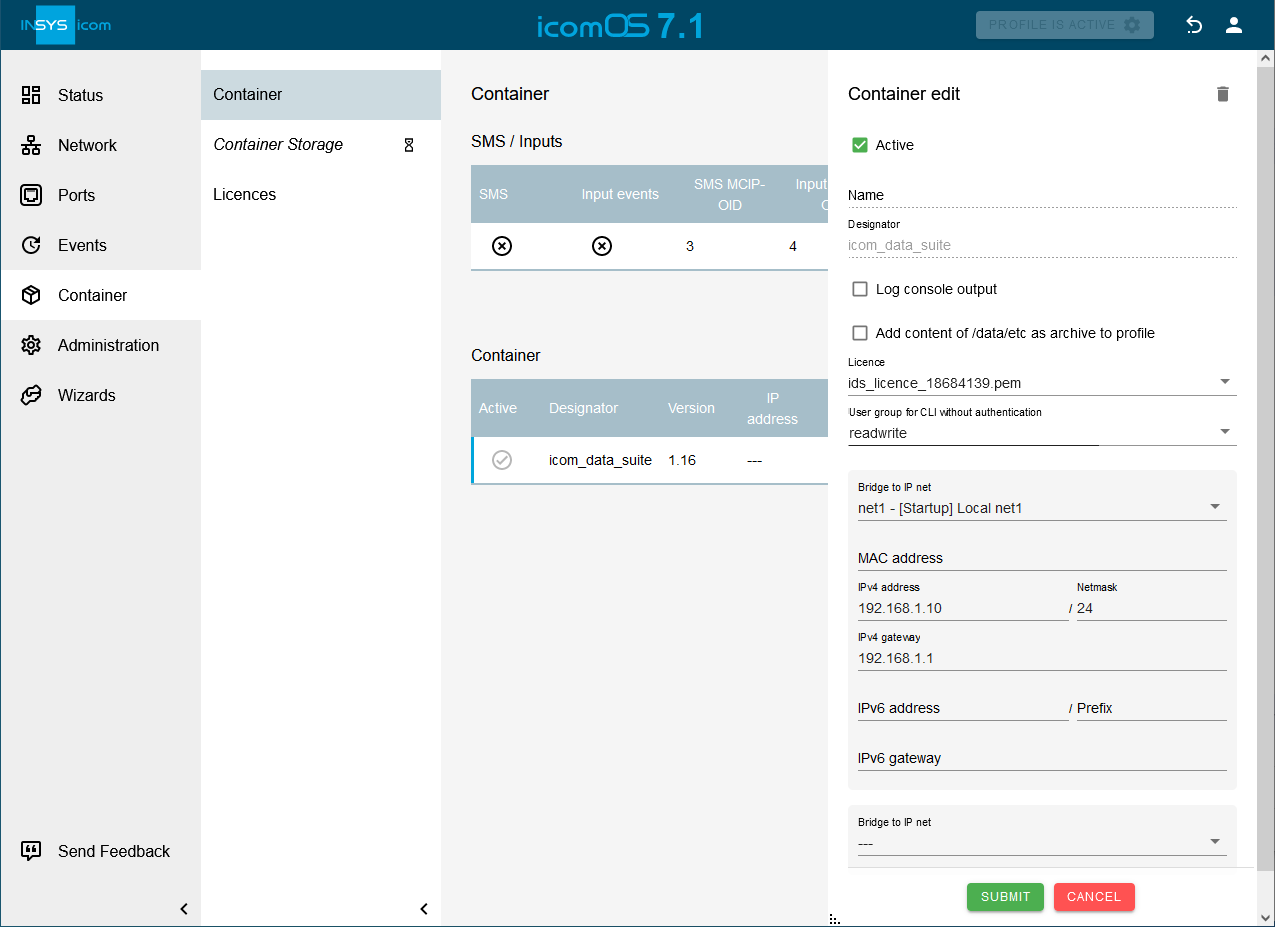
Click on SUBMIT.
Click on ACTIVATE PROFILE .
Enter the IP address you entered in the last step into your browser to open the icom Data Suite.
Please note!
If access takes place via HTTPS and no CA certificate of INSYS is installed in the browser, it might be necessary to make an exception in the browser here.
User name: insys (default)
Password: icom (default)
Open the Status → Licence menu of the icom Data Suite to verify your licence.
You have now installed the icom Data Suite and, if applicable, the corresponding licence on your router.
Starting the free test period
The free test period grants full access to all functions of the icom Data Suite for a limited time.
Click in the Status → Overview menu of the icom Data Suite on the Start test period button.
Open the Status → Licence menu of the icom Data Suite to verify whether the test period grants access to all functions.
Manual installation of an icom Data Suite licence
It is prerequisite that the licence package is stored on your computer. Please note that licensing takes place on the router on which the container of the icom Data Suite has been installed and not in the container itself.
Open the user interface of the router: https://insys.icom
Click in the
Container → Licences menu on and select the licence package.Please note!
The licence package of the icom Data Suite has a file name such as ids_licence_<s/n>.tar, e.g. ids_licence_12345678.tar
Click on SUBMIT.
The licence will be imported.Click in the
Container → Container menu in the Container section in the row of the container of the icom Data Suite on and configure the container:Licence: select the licence uploaded in the last step if available
Click on SUBMIT.
Click on ACTIVATE PROFILE .
You have imported the licence and assigned it to the icom Data Suite container with this.
Troubleshooting
If the name of the container that contains the icom Data Suite has been modified after installation, it is necessary to assign the licence file to the container manually. The following steps in the user interface of the router are necessary for this:
Click in the
Container → Container menu in the Container section in the row of the container of the icom Data Suite on and assign the licence package to the container:Click on SUBMIT and on ACTIVATE PROFILE .