IP forwarding (1:1 NAT) enables access to devices in other networks of the INSYS router.
Situation
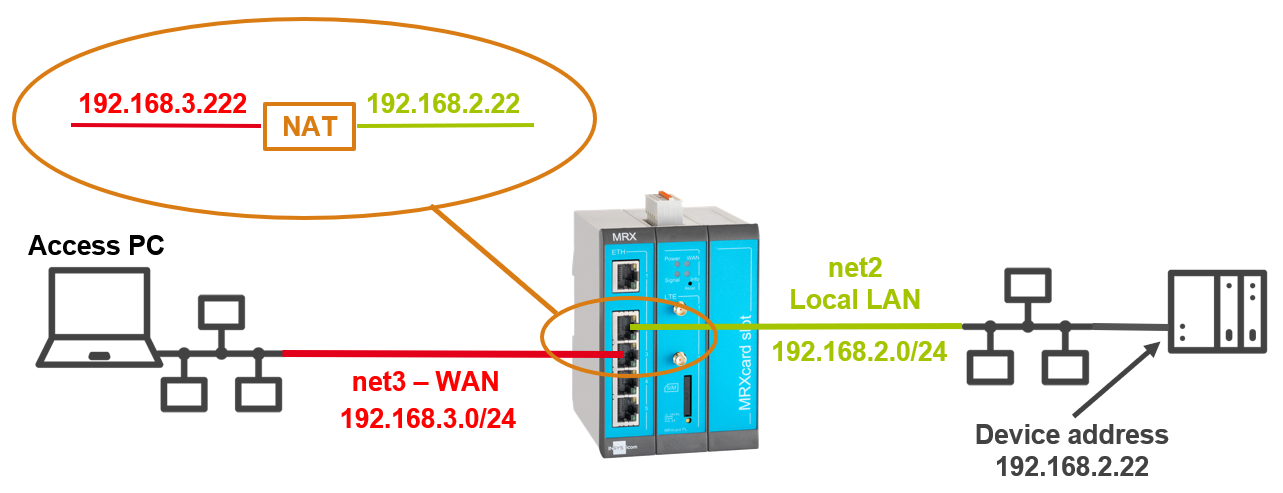
A device in the local network of the router is to be accessed from a device that is in the WAN network of the router. The local network of the router is not accessible from the WAN network via routing.
Solution
A additional IP address will be defined in the WAN network and a NAT rule will be added in the router, which will forward requests directed to this IP address to the IP address of the target device.
In the following overview image, the target device has the address 192.168.2.22 in the IP network net2 of the router. The additional IP address in the IP network net3 of the router has the address 192.168.3.222.
Open the user interface of the router: https://insys.icom
Click on the Network → Interfaces page under IP networks in the row of IP net net3 on to edit it.
Click in the Static IP addresses section on to add a static IP address (make sure to use a free IP address in this network):
IP address: 192.168.3.222 / 24
Description: NAT to LAN address
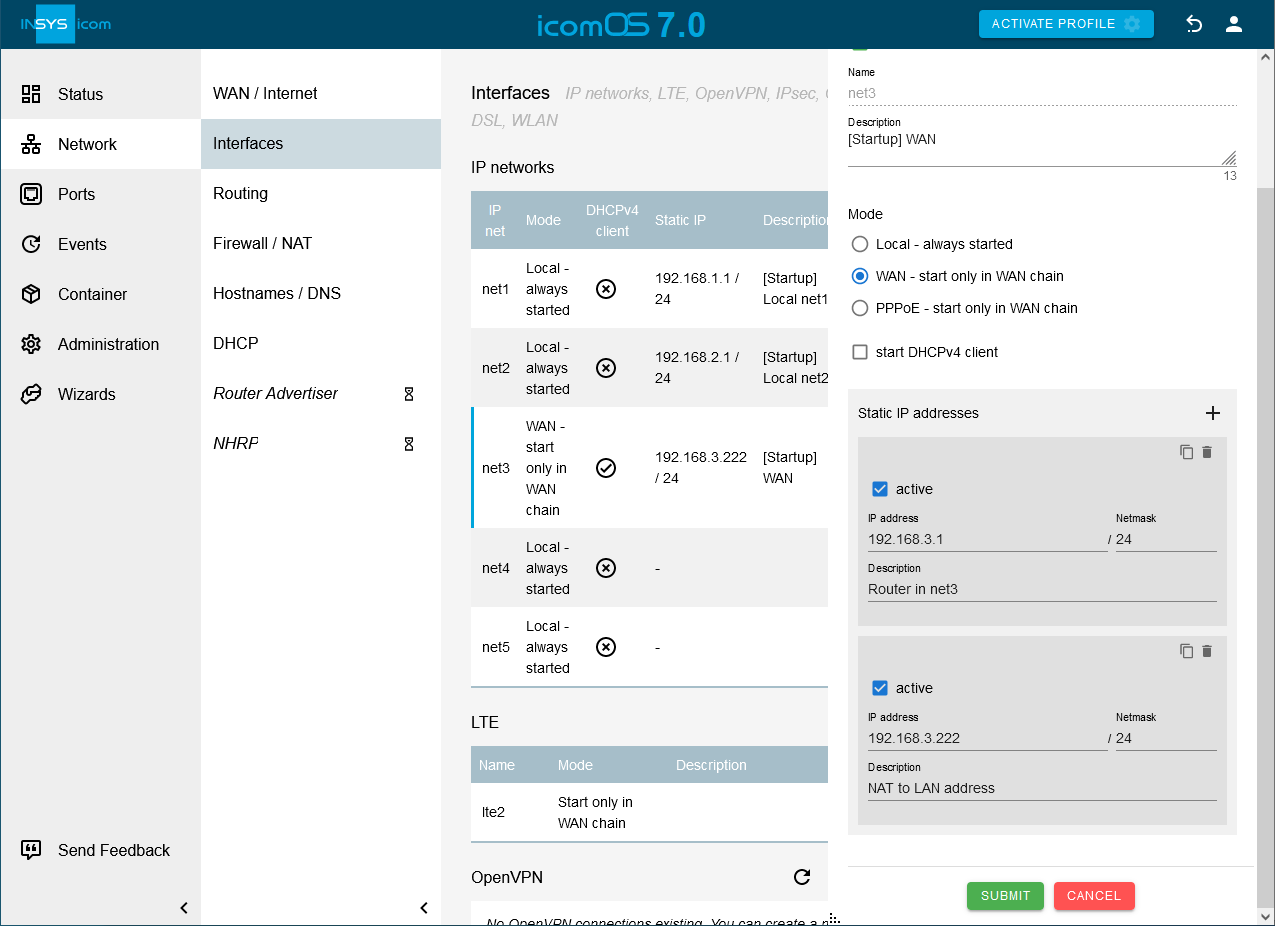
Click on SUBMIT.
Click on the Network → Firewall / NAT page under Destination NAT on to add a destination NAT rule: and configure this accordingly:
Description: DNAT rule for IP forwarding from net3 to net2
Type: Destination NAT
Protocol: All
Input interface: net3
Destination IP address: 192.168.3.222 / 32
Destination NAT to address: 192.168.2.22
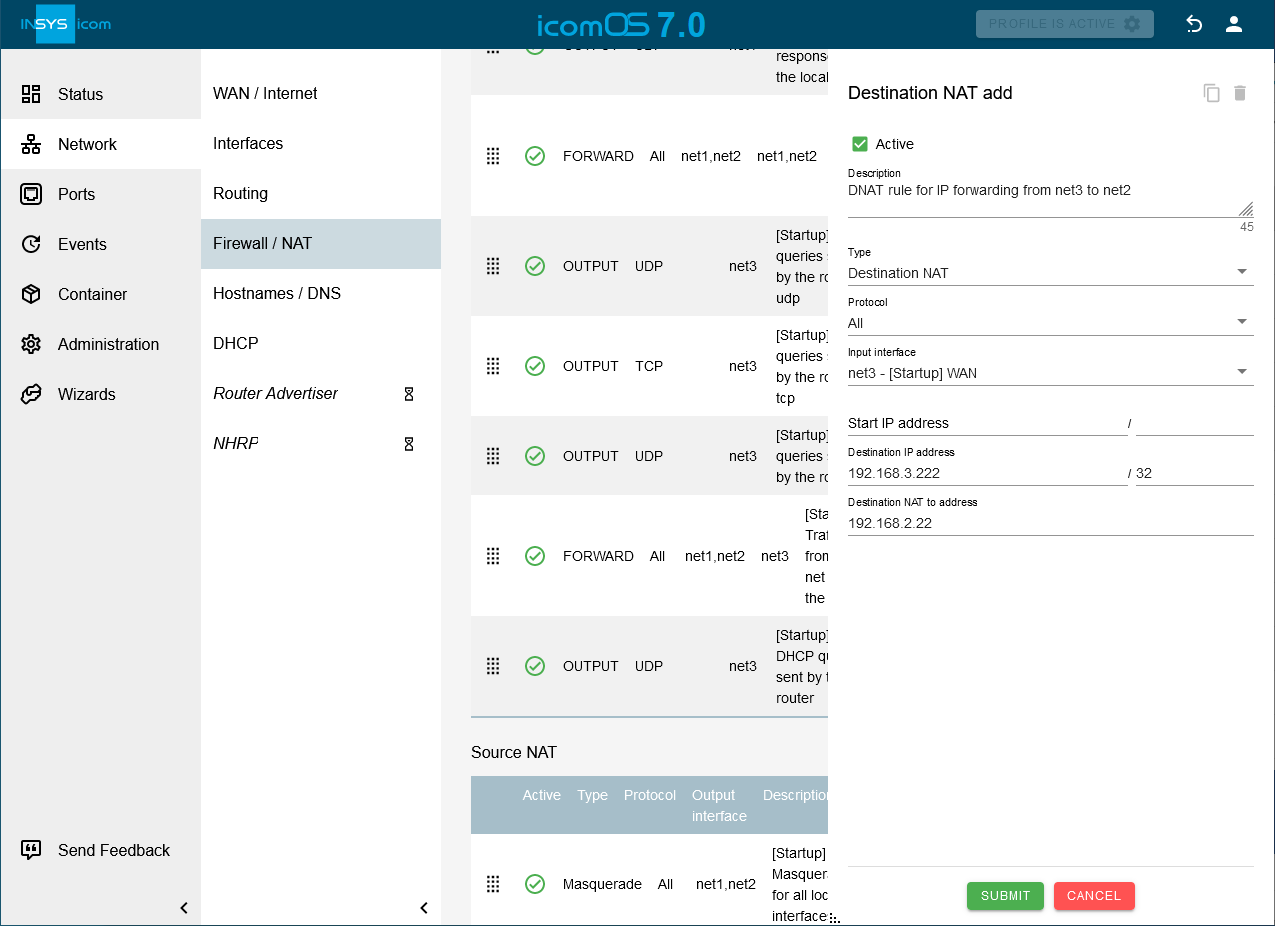
Click on SUBMIT.
[Optional] Click on the Network → Firewall / NAT page under Source NAT on
 to add a source NAT rule that enables to start the connection also from the other end, i.e. from net2 and configure this accordingly:
Description: SNAT rule for IP forwarding from net2 to net3
Type: Source NAT
Protocol: All
Output interface: net3
Source IP address: 192.168.2.22 / 32
Source NAT to address: 192.168.3.222
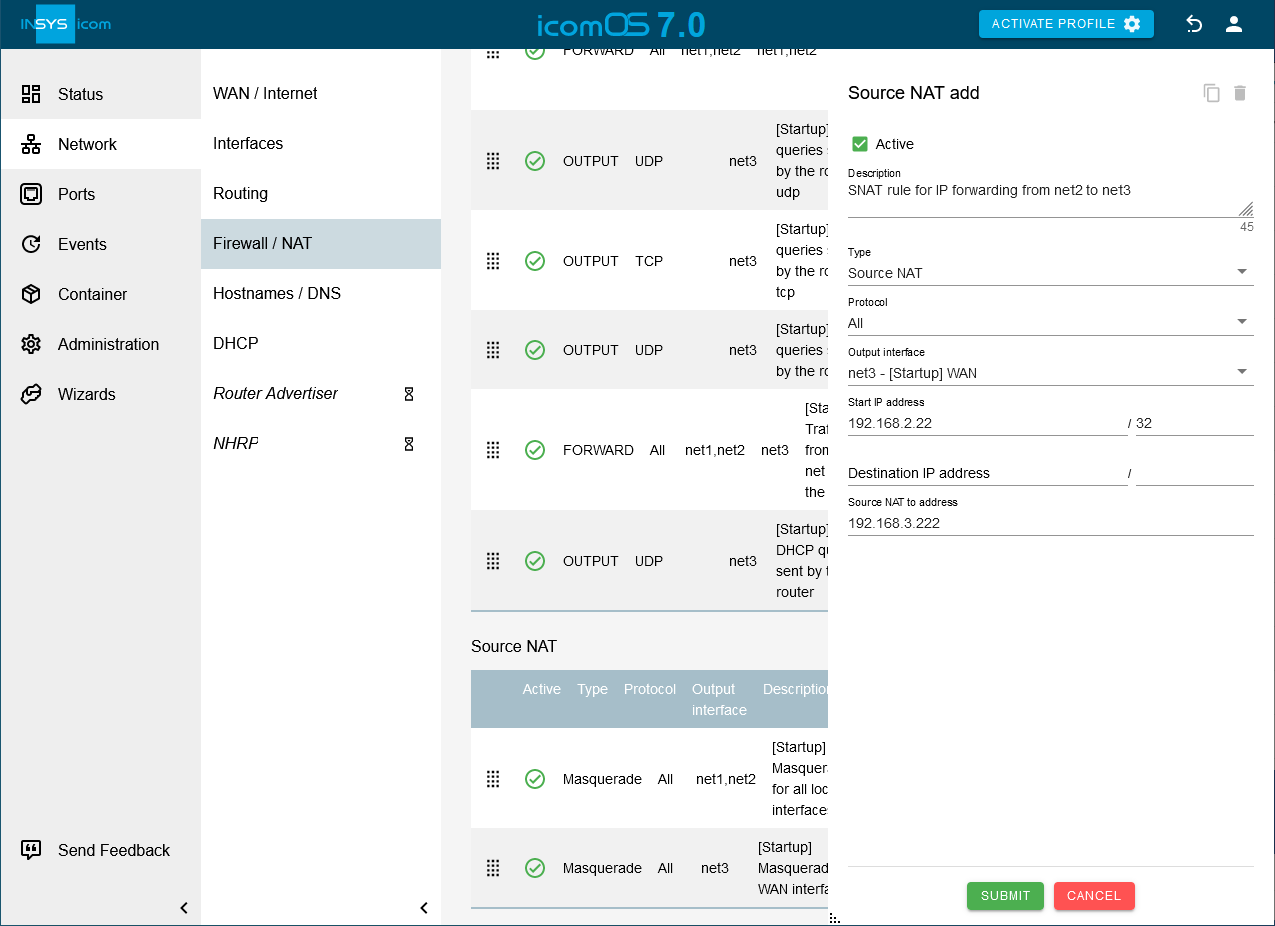
Click on SUBMIT.
Click on the Network → Firewall / NAT page under IP filter on to add an IP filter rule that enables the transmission of data packets from IP network net3 to IP address 192.168.2.22 in IP network net2 if IP filters are activated and configure this accordingly:
Description: Traffic from net3 to 192.168.2.22
Packet direction: FORWARD
IP version: All
Protocol: All
Input interface: net3
Output interface: net2
Destination IP address: 192.168.2.22 / 32
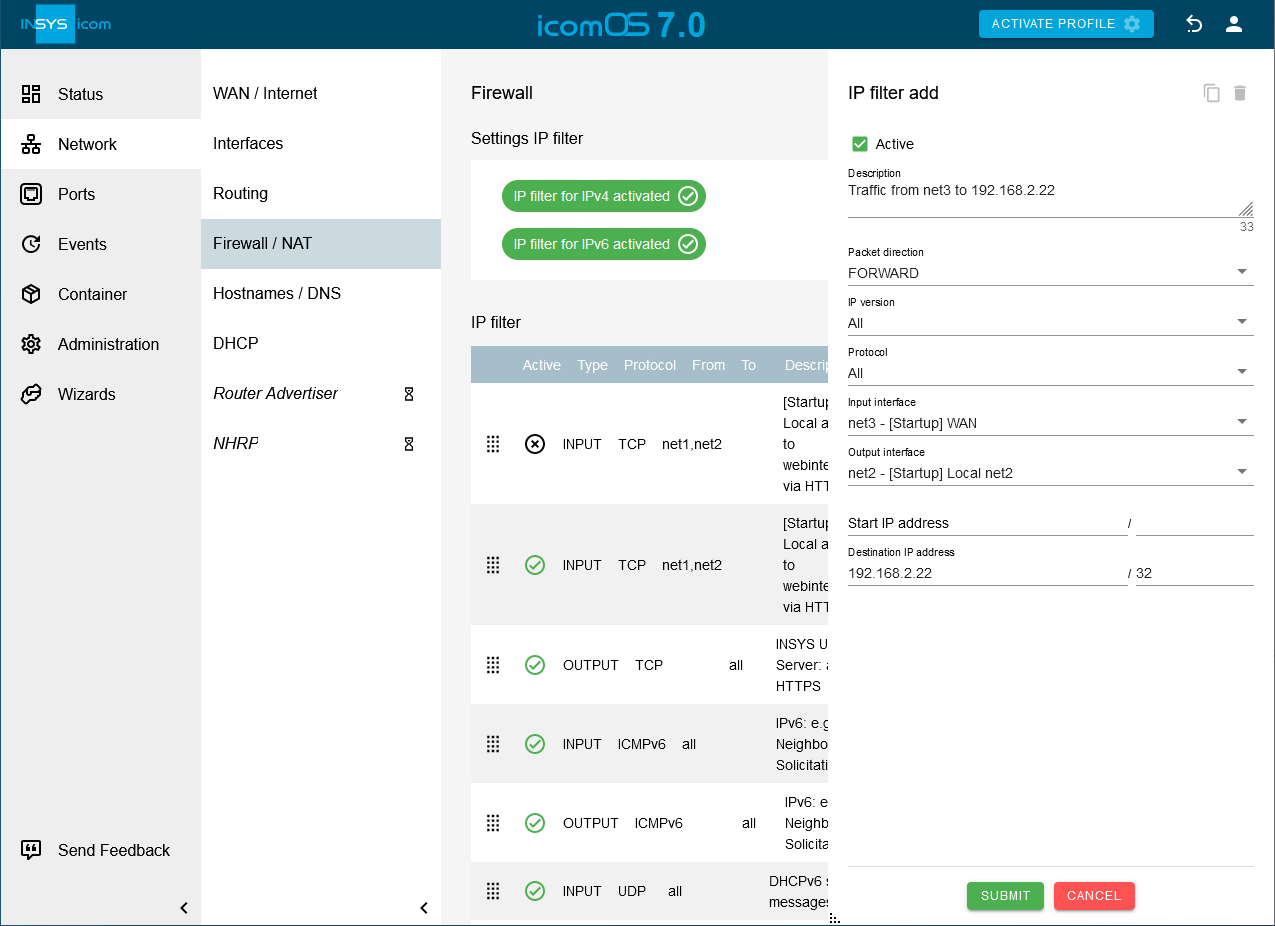
Click on SUBMIT.
[Optional] Click on the Network → Firewall / NAT page under IP filter on to add an IP filter rule that enables the transmission of data packets from IP address 192.168.2.22 to IP network net3 if IP filters are activated and a source NAT rule has been configured and configure this accordingly:
Description: Traffic from 192.168.2.22 to net3
Packet direction: FORWARD
IP version: All
Protocol: All
Input interface: net2
Output interface: net3
Source IP address: 192.168.2.22 / 32
Destination IP address: 192.168.3.0 / 24

Click on SUBMIT.
Activate the profile with a click on ACTIVATE PROFILE .
Result testing
Open a terminal on a PC in IP network net3, type
ping 192.168.3.222and observe if the remote terminal responds.
Troubleshooting
Disable the IP filters for IPv4 in the Network → Firewall / NAT menu under Settings IP filter to check whether incorrect filter settings are the reason for connection problems.
Proceed as follows to ensure that ping requests are not responded to by the router, but by the addressed device:
Open a terminal on a PC in the remote network net3 and type
ping 192.168.3.222.Click in the Administration → Debugging menu on OPEN DEBUG TOOLS , select the tool TCP-Dump, enter the parameter -i net3 and click on SEND. This TCP dump enables you to verify that the ICMP packets are incoming at the router.
Type
ping 192.168.3.222again in the terminal.Start a TCP dump again, this time with the parameter -i net2. This TCP dump enables you to verify that the ICMP packets of the PING request are also forwarded to the IP network net2 and NAT is working.
Check whether you have set the IP address of the router in the IP network net2 as default gateway address for your end device or alternatively a static route to the IP network net3 in your end device. If not, you need to create a Masquerade source NAT rule for IP network net2.