The router allows to send e-mail messages upon various events.
The messages can be sent via any e-mail account that supports SMTP.
Situation
You need to send e-mails from the router upon the occurrence of certain events. An e-mail account must be configured in the router for this before.
Solution
It is prerequisite that you have access to the web interface of the router and the router has Internet access. It is recommended to commission the router as suggested in the Quick Installation Guide for this. It is also prerequisite that an e-mail account with a provider exists and the access data are known.
Configuration via user interface
Open the user interface of the router: https://insys.icom
Click in the Events → E-mail account menu on in the row of the e-mail account that you want to configure and configure it accordingly:
E-mail address of sender: e-mail address as registered with the provider
Real name: freely selected name that is displayed to identify the sender
SMTP server: the domain name or IP address of the SMTP server
SMTP port: the SMTP port, which is used for accepting e-mails
User name: user name for logging in the router to the SMTP server for e-mail dispatch
Password: password for authentication
Encoding: the following options are available for this
none: the connection to the e-mail server will not be encrypted
STARTTLS: the connection will be established unencrypted, encryption will be negotiated upon connection establishment
SSL: the connection will always be encrypted using SSL/TLS
Trusted CA certificates: specification of which certificates are trusted to verify the server certificate of the remote terminal
Verify server certificate: [optional]
Verify host name of server: [optional]
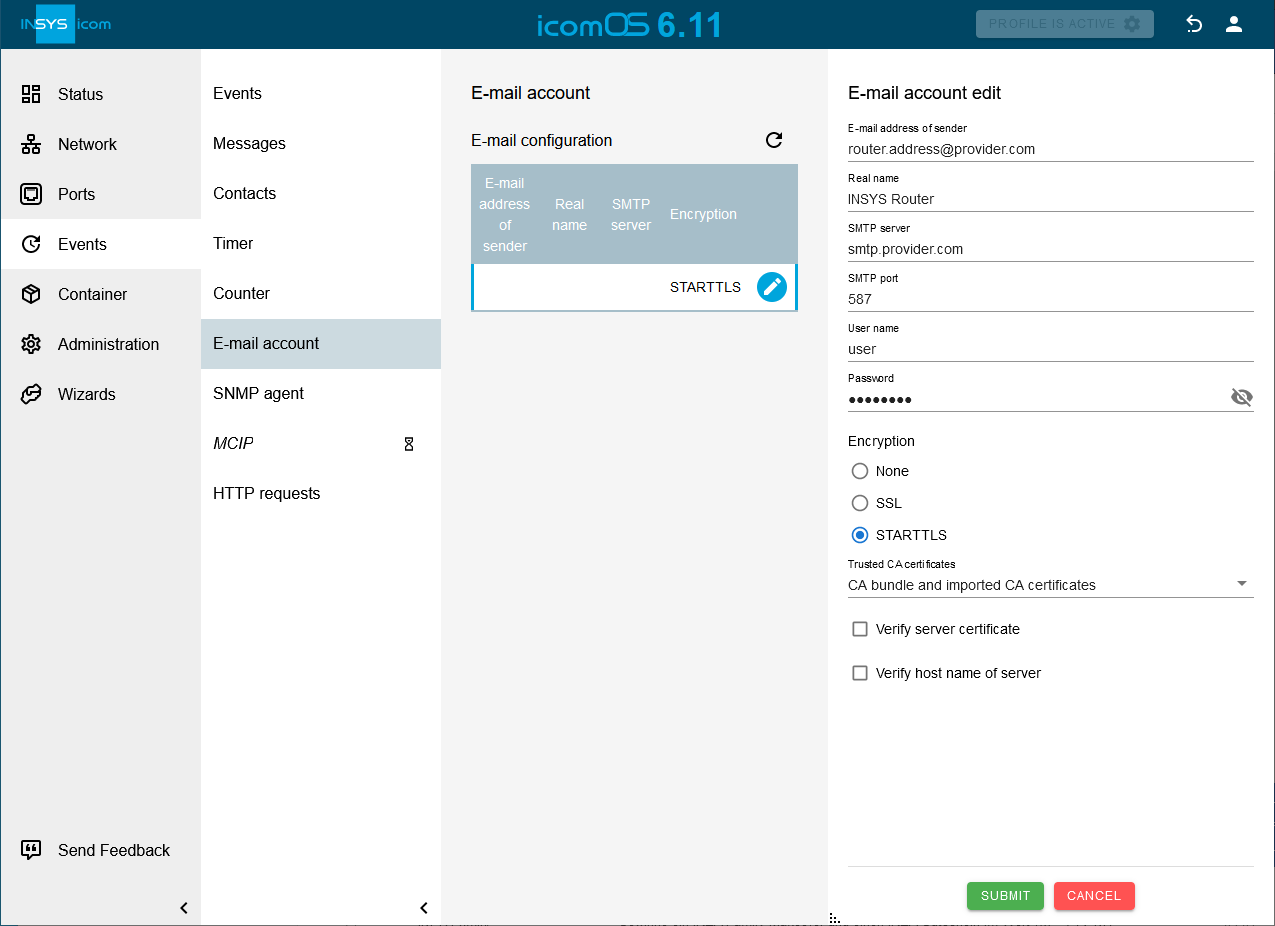
Click on SUBMIT.
Click in the Network → Firewall / NAT menu on to add a new IP filter rule for e-mail dispatch that permits the router the outgoing TCP connection to the SMTP server of the e-mail provider:
Description: E-mail dispatch
Packet direction: OUTPUT
Protocol: TCP
Output interface: select the WAN interface used, e.g. lte2
Destination port: enter the SMTP port configured in the e-mail account settings above
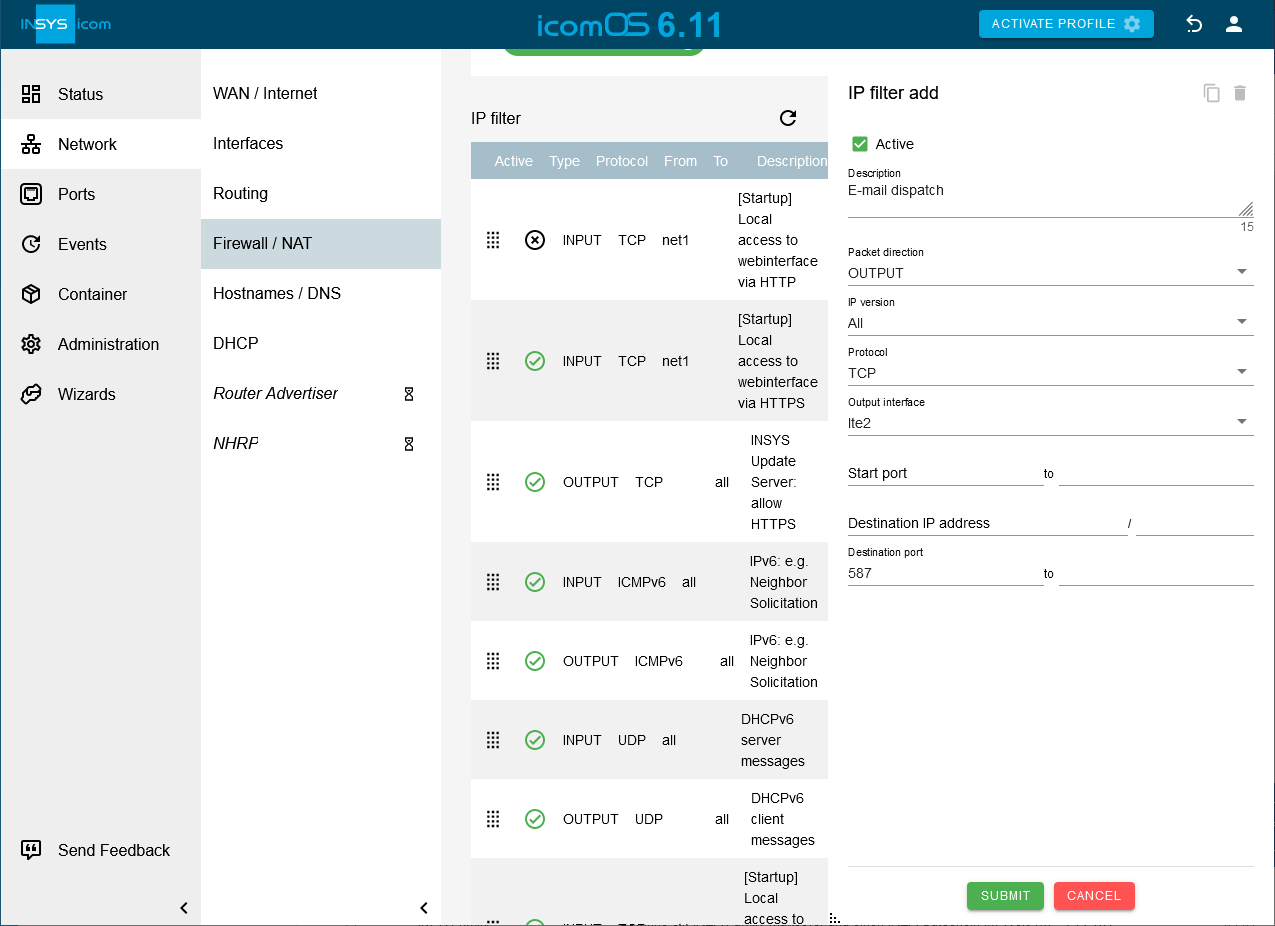
Click on SUBMIT.
Activate the profile with a click on ACTIVATE PROFILE .
Configuration via ASCII configuration file
It is also possible to add the e-mail account configuration using an ASCII configuration file. We’ve prepared the following ASCII configuration file for this. Copy and paste the content into your text editor. You still need to replace the respective entries with your e-mail account information. The IP filter rules permit e-mail dispatch and DNS requests and must be adjusted to the e-mail account settings as well (port!).
ASCII configuration file:
events.email_account.address=router.address@provider.com
events.email_account.real_name=INSYS Router
events.email_account.server=smtp.provider.com
events.email_account.encryption=starttls
events.email_account.verify_peer=0
events.email_account.verify_host=0
events.email_account.port=587
events.email_account.username=user
events.email_account.password=password

netfilter.ip_filter.rule.add
netfilter.ip_filter.rule[last].rule_active=1
netfilter.ip_filter.rule[last].rule_description=E-mail dispatch
netfilter.ip_filter.rule[last].rule_direction=output
netfilter.ip_filter.rule[last].rule_protocol=tcp
netfilter.ip_filter.rule[last].rule_output_if=lte2,net3
netfilter.ip_filter.rule[last].rule_dport=587
netfilter.ip_filter.rule[last].rule_ipversion=all

administration.profiles.activate
Good to know!
The last line in the ASCII configuration file will activate the profile that is amended by this configuration directly upon applying the configuration.
Open the user interface of the router: https://insys.icom
Click in the Administration → Profile menu on , select the ASCII configuration file to be uploaded and click on SUBMIT.
In order to apply an ASCII configuration file, click in the Administration → Profile menu on in the row of the respective configuration file, then on Apply ASCII configuration and on APPLY ASCII CONFIGURATION.
Activate the updated profile with a click on ACTIVATE PROFILE .
Open the Events → E-mail account menu and click on in the row of the e-mail account to verify the changes made to the e-mail account.
Troubleshooting
Confirm the spelling of e-mail and SMTP server address (not case-sensitive).
Make sure to use the correct SMTP port.
Make sure to use the correct encryption method.
Disable the IP filters for IPv4 in the Network → Firewall / NAT menu under Settings IP filter to check whether incorrect filter settings are the reason for connection problems.
Check in the
 Status → Log-View menu the messages in the Events log.