Despite the very high availability of the icom Connectivity Suite - VPN, a redundant instance can preserve availability in the event of a rare failure of the primary instance.
The icom Connectivity Suite - VPN is a service of INSYS icom for the simple and secure network connection of locations, plants, control centers and mobile devices via a Virtual Private Network (VPN).
Check your device!
This Configuration Guide only applies to routers of INSYS icom running under the icom OS operating system. These include the router series MRX, MRO, ECR, SCR as well as MIRO and MIROdul.
Situation
You are using the icom Connectivity Suite - VPN and would like to take further action to avoid unexpected downtime.
Solution
Various technologies ensure that each instance of the icom Connectivity Suite - VPN has a very high level of availability. However, the permanent availability of the icom Connectivity Suite - VPN may be limited by short-term failures of individual elements of the instance. For critical applications, a secondary instance hosted in another data center can be used, to which the router switches in the event of a failure of the primary instance. A fallback function regularly checks the return of the primary instance and switches back to it if it is available again.
Important note for China users!
Increasing the availability of the icom Connectivity Suite - VPN through redundant instances is not possible for instances configured to connect to routers in mainland China (China VPN).
The following Configuration Guide shows the requirements for the secondary instance and how to configure a router registered in the icom Connectivity Suite - VPN accordingly.
Please note!
The primary and secondary icom Connectivity Suite - VPN instances described here remain separate networks. Therefore, all devices necessary for redundant communication via the secondary instance (e.g. used during a failure of the primary instance) must be properly licensed and configured, as described in this Configuration Guide.
It is assumed that you
have already registered an account for the icom Connectivity Suite - VPN, as described in this Configuration Guide,
have added the router to the icom Connectivity Suite - VPN as described in this Configuration Guide, and
have configured the router to connect to the icom Connectivity Suite - VPN as described in this Configuration Guide.
Ordering a secondary instance
Contact the INSYS icom sales department and order another instance of the icom Connectivity Suite - VPN. Mention that you want to use the secondary instance for a redundant operation and to be hosted in a different data center than your primary instance.
INSYS icom will ensure that both instances are hosted in different data centers.
Please note!
This secondary instance is not intended for a simultaneous operation with the primary instance, but as a backup in case the primary instance is not available.
Reconfiguring the connection to the icom Connectivity Suite - VPN
Routers configured to connect to the icom Connectivity Suite - VPN before Q2 2023 must be reconfigured to enable secure redundancy operation. If the router was configured for operation with the icom Connectivity Suite - VPN after Q1 2023, this step can be skipped.
Open the portal of the icom Connectivity Suite for your primary instance:
https://connectivity.insys-icom.de (or the link you’ve received from your distribution partner)
Select your preferred language under Sprache or Language and click on Log in.
Select on the Devices page in the device list the device to be configured and click on the device details page on DOWNLOAD CONFIGURATION.
Save the configuration file on your computer.
Please note!
This is a regular ASCII configuration file for updating the profile of the router with the necessary settings.
Open the user interface: https://insys.icom
Click on the Administration → Profiles page in the ASCII configurations section on and upload the previously downloaded ASCII configuration file.
Click on SUBMIT.
Click on the Administration → Profile page in the ASCII configurations section behind the previously uploaded configuration file on .
Then click on in the action area that opens and then on APPLY ASCII CONFIGURATION to apply an ASCII configuration file.
Click on ACTIVATE PROFILE to activate a profile.
The profile updated with the ASCII configuration file will be activated and the router will connect again now to this instance of the icom Connectivity Suite – VPN.
Adding the router to the secondary instance of the icom Connectivity Suite - VPN
The router must also be added to the secondary instance of the icom Connectivity Suite, which will then provide a configuration file for the connection.
Do not open the user interface of the second instance in the same browser!
The secondary instance cannot be opened in the same browser window as the primary one and must be opened in another browser or, for example, in private mode of the same browser.
Open the portal of the icom Connectivity Suite for your secondary instance in another browser:
Select your preferred language under Sprache or Language and click on Log in.
Add the router as described in this Configuration Guide.
Select on the Devices page in the device list the device to be configured and click on the device details page on DOWNLOAD CONFIGURATION.
Save the configuration file on your computer.
Configuring the router for a connection to the secondary instance of the icom Connectivity Suite - VPN
The configuration file of the secondary instance must be uploaded to the router. It configures a second OpenVPN connection to the secondary instance of the icom Connectivity Suite there and also creates the associated routes and filter rules. It also adds an update server for the secondary instance. The OpenVPN connection to the secondary instance will be added to the existing WAN chain and must be manually moved to a second WAN chain that will be used to establish the connection to the secondary instance.
Open the user interface: https://insys.icom
Click in the Administration → Profiles menu in the ASCII configurations section on and upload the previously downloaded ASCII configuration file of the secondary instance.
Click on SUBMIT.
Click on the Administration → Profile page in the ASCII configurations section behind the previously uploaded configuration file of the secondary instance on .
Then click on in the action area that opens and then on APPLY ASCII CONFIGURATION .
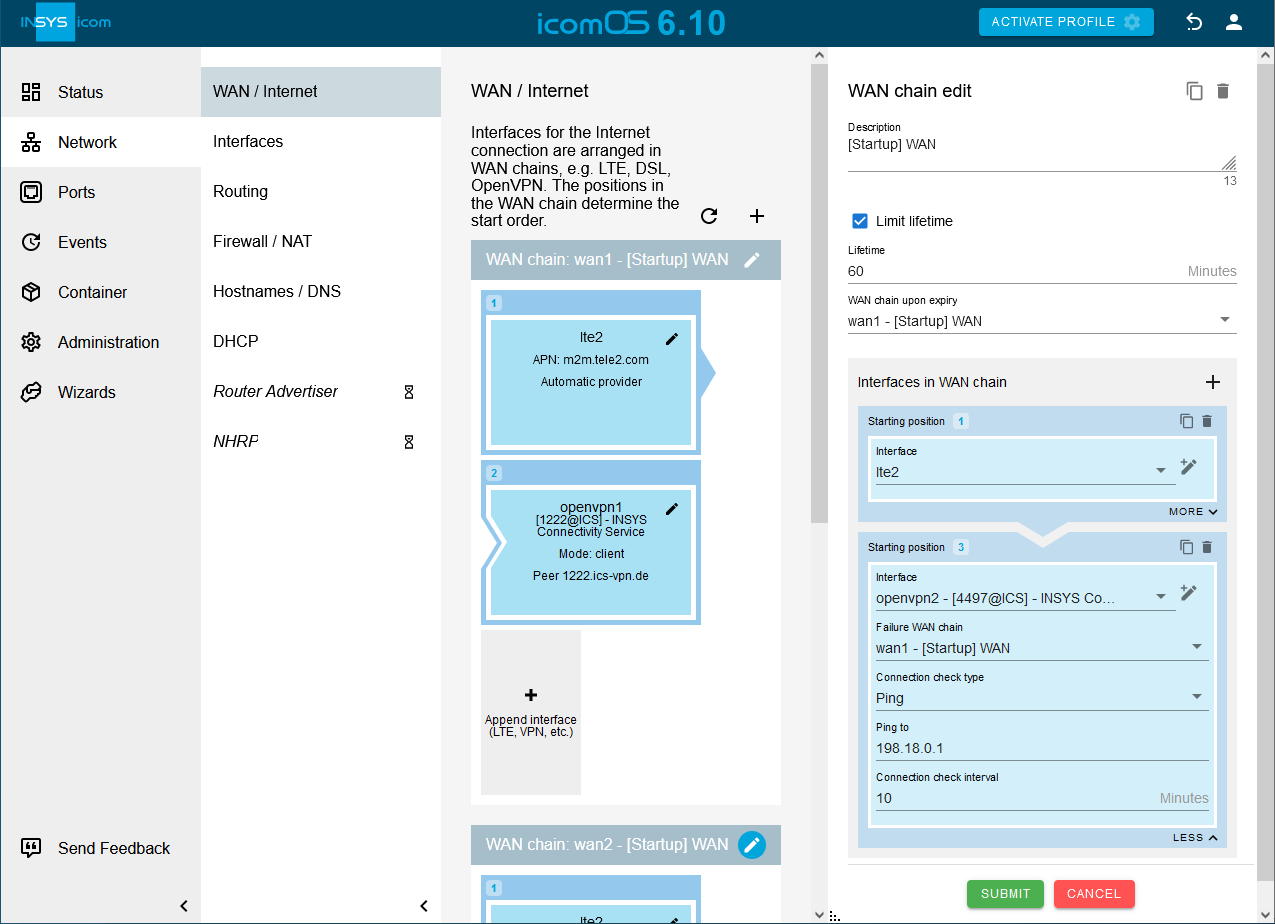
Click on behind the WAN chain wan1 on the Network → WAN / Internet page to edit this WAN chain.
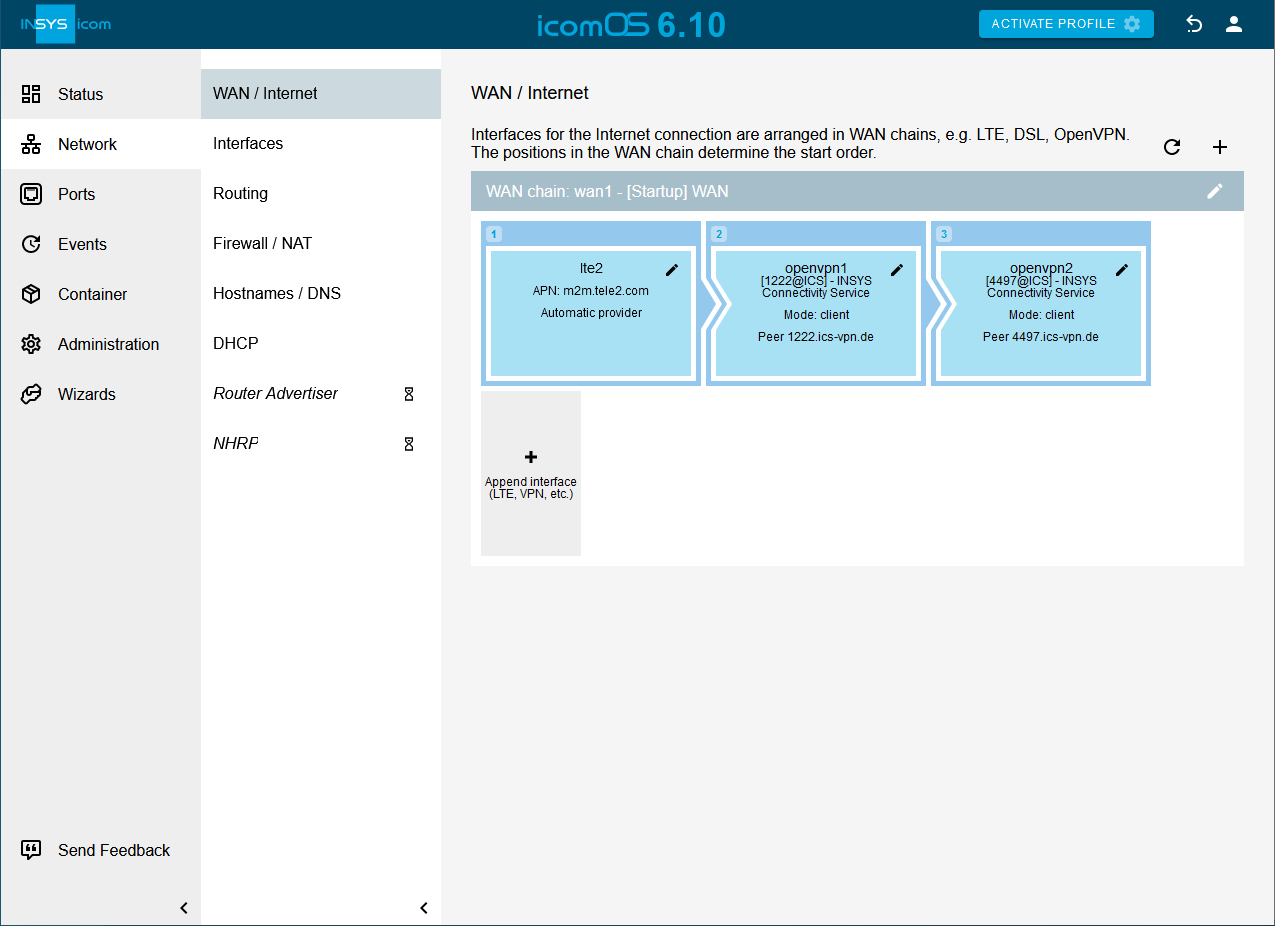
Click on at the top right to copy this WAN chain.
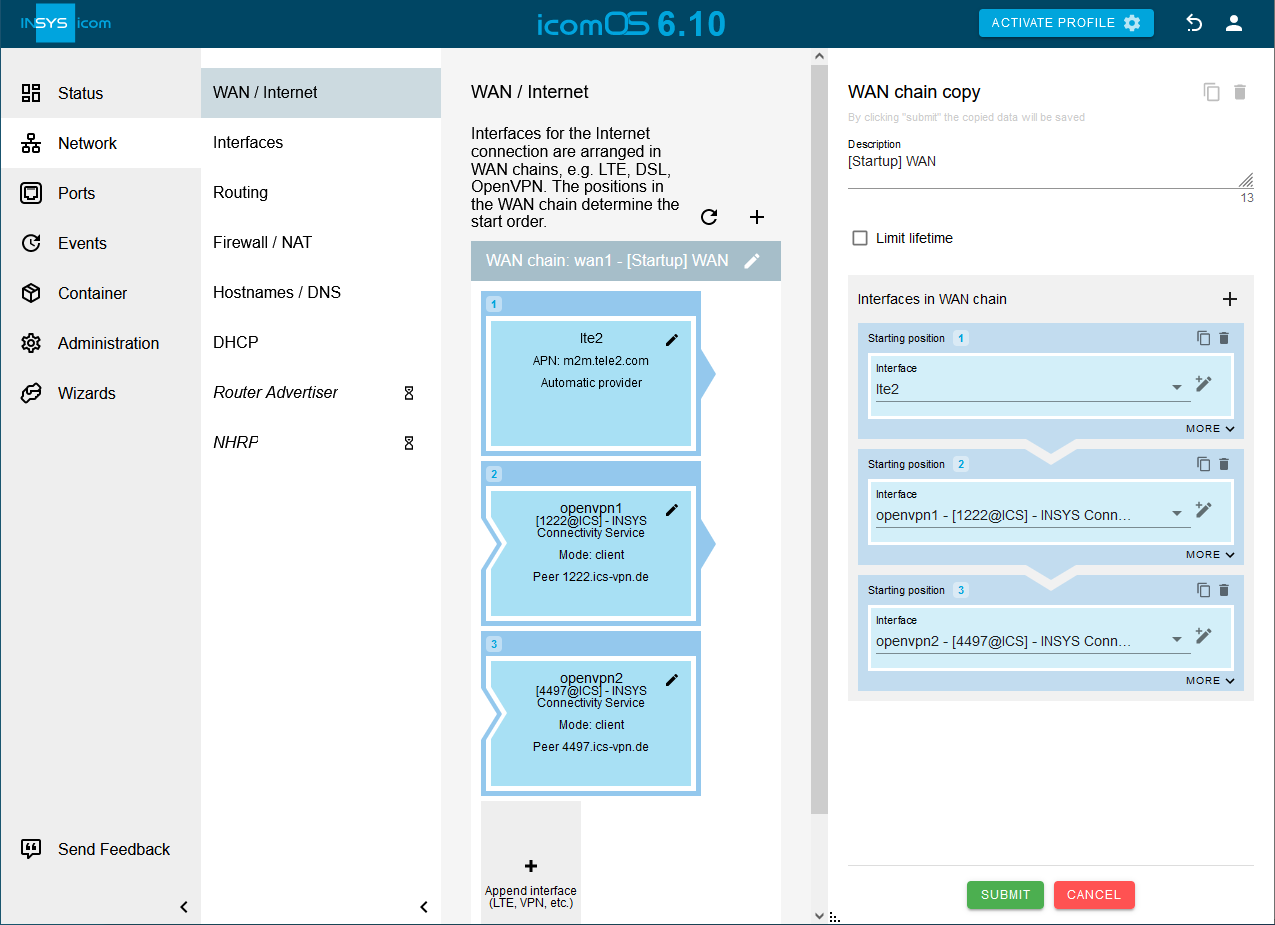
Click on SUBMIT.
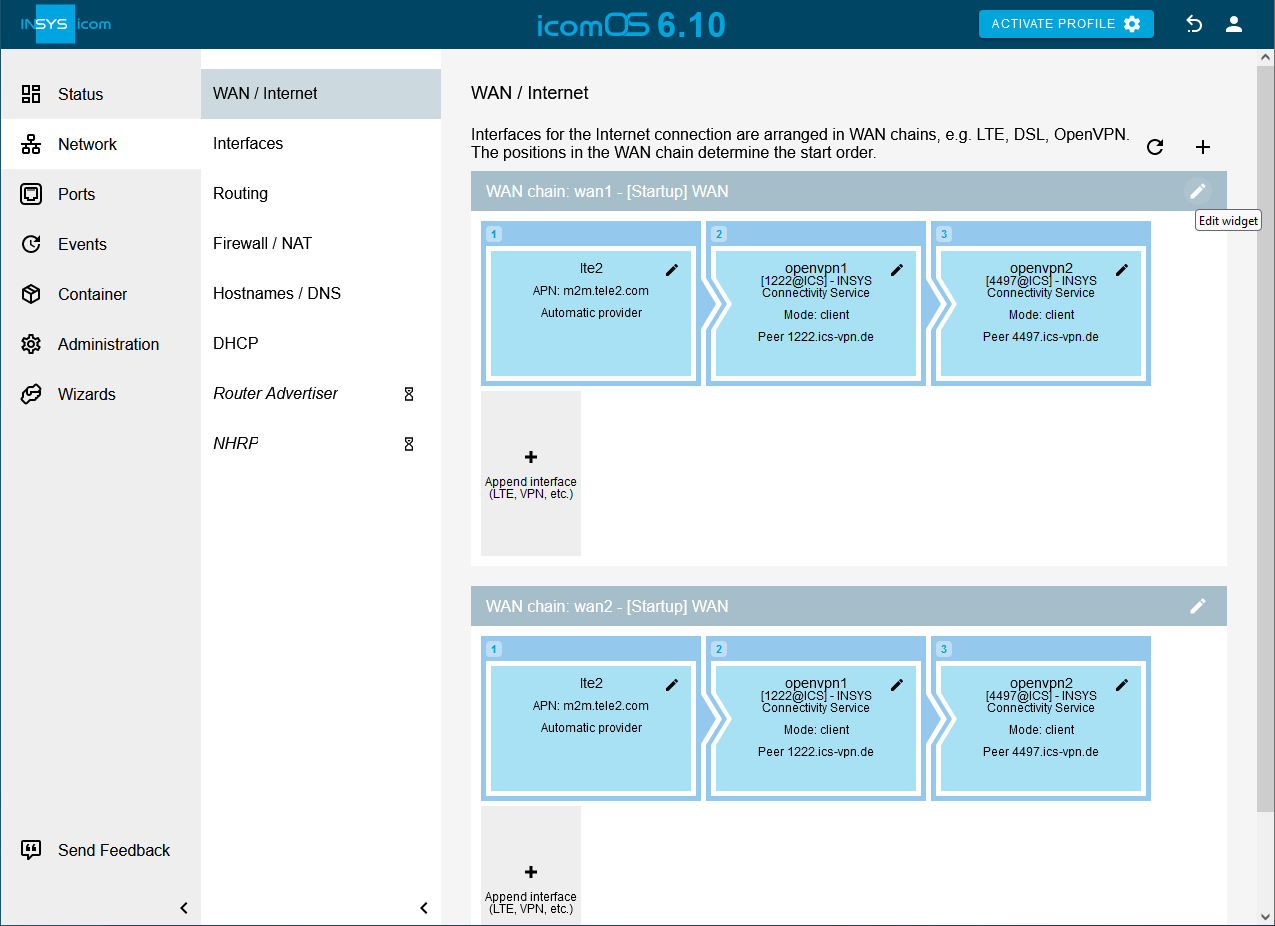
Click on behind the WAN chain wan1 again to edit this WAN chain.
Delete the third interface of the WAN chain openvpn2 by clicking on in the Starting position 3 field.

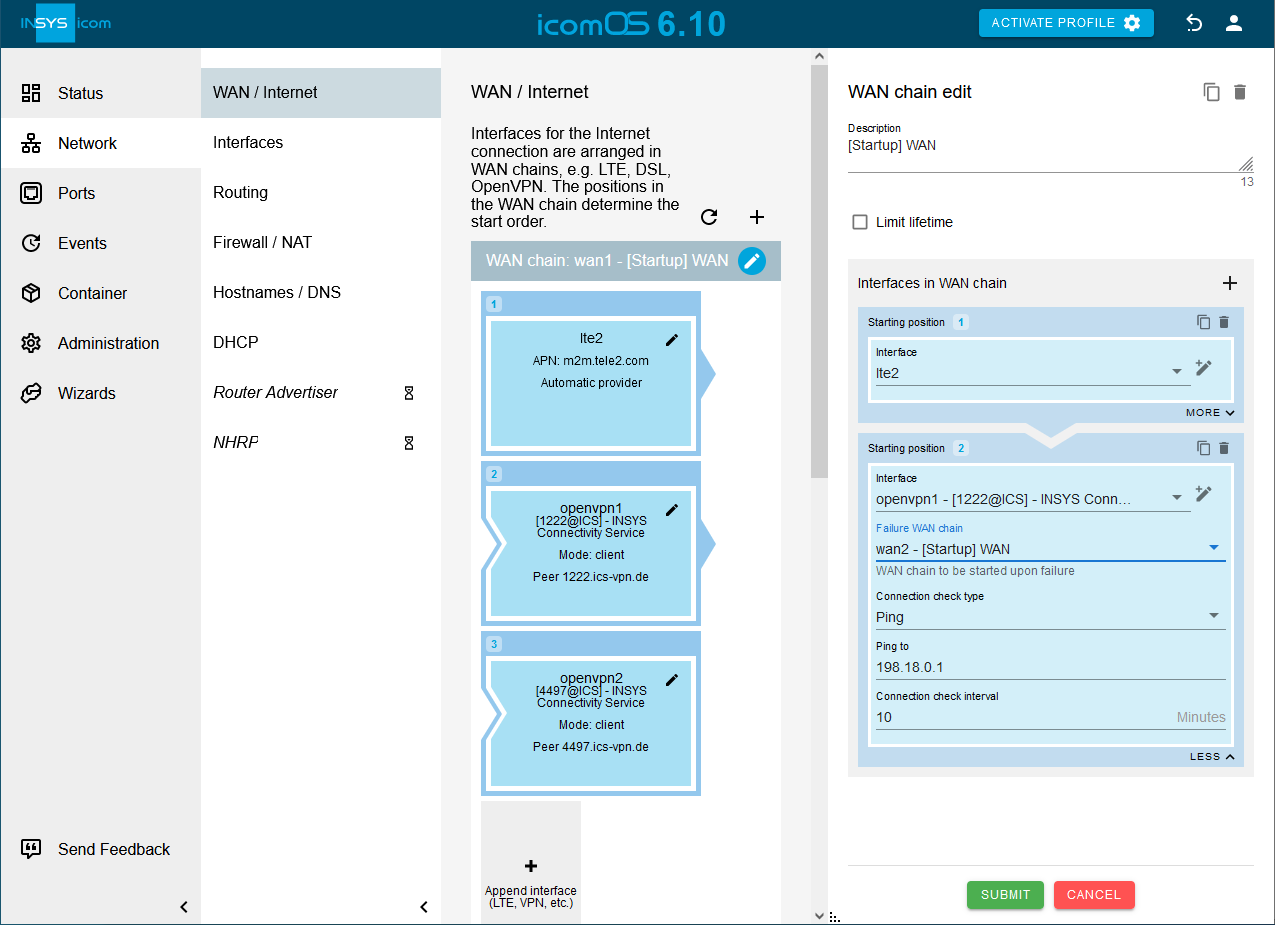
Click on MORE in the Starting position 2 field of the second interface of the WAN chain openvpn1 at the bottom and select the WAN chain wan2 under Failure WAN chain.
Please note!
If the connection check configured for this interface detects a connection failure, the WAN chain wan2 will be started, which is used to establish the connection to the secondary instance of the icom Connectivity Suite - VPN.
Click on SUBMIT.
Click on behind the WAN chain wan2 to edit this WAN chain.
Change the Description of the wan chain: [Startup] WAN2 (suggestion)
Delete the second interface of the WAN chain openvpn1 by clicking on in the Starting position 2 field.
Click on MORE in the Starting position 2 field of the current second interface of the WAN chain openvpn2 at the bottom and select the WAN chain wan1 under Failure WAN chain.
Check the option Limit lifetime, enter a lifetime for this WAN chain and select under WAN chain upon expiry wan1 as WAN chain.
Please note!
The WAN chain for the connection to the secondary instance will be disconnected after the lifetime has expired and the WAN chain wan1 will be started, which is used to establish the connection to the primary instance of the icom Connectivity Suite - VPN.
Click on SUBMIT.
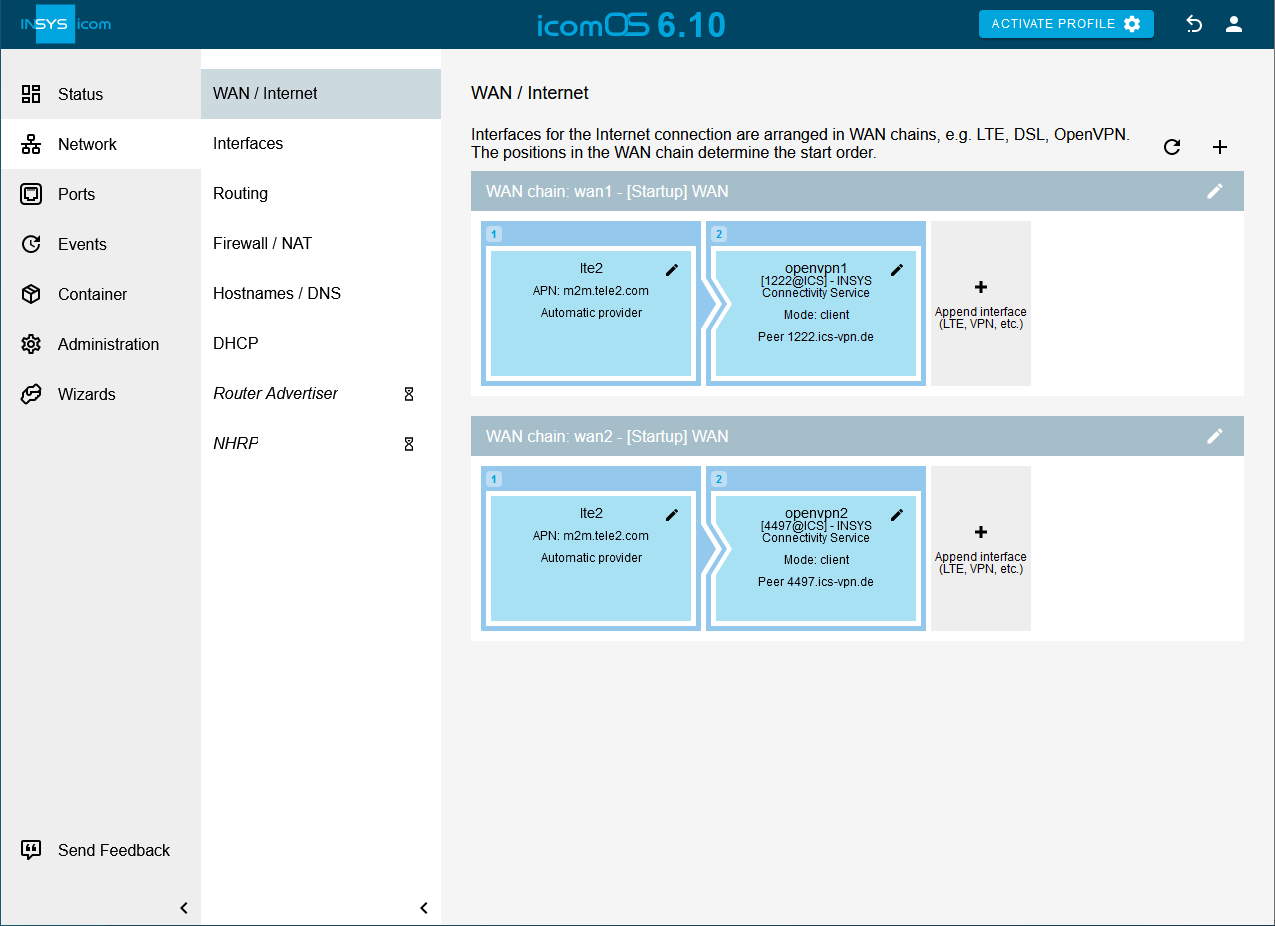
Activate the profile with a click on ACTIVATE PROFILE .
The router now has two WAN chains, wan1 and wan2, the first of which starts the OpenVPN connection to the primary instance of the icom Connectivity Suite and the second of which starts the OpenVPN connection to the secondary instance. If the OpenVPN connection to the primary instance of the icom Connectivity Suite is detected as broken, the second WAN chain will be started, which establishes an OpenVPN connection to the secondary instance of the icom Connectivity Suite. In order to avoid continuous operation with the secondary instance, this WAN chain will be disconnected again after a certain time has elapsed and the WAN chain wan1 will be restarted, which starts an OpenVPN connection to the primary instance of the icom Connectivity Suite. If the primary instance is available again, operation will return to normal via the primary instance; if it is not yet available again, there will be another temporary switch to the secondary instance.
Please note!
To ensure the availability of the devices in times of unexpected downtime of the icom Connectivity Suite, it is important that you regularly test the connection of the devices to the secondary instance to ensure that it is available when you need it. Regular testing provides the additional benefit of regular updates which help to ensure the reliability of the configuration.
An improvement of the availability via a redundancy of the WAN connection, for example by a second cellular connection via another provider or an additional LAN connection can be realised in a similar way using WAN chains. Refer to this Configuration Guide for this.
However, the setup described in this Configuration Guide does not yet ensure a secure configuration for the icom Connectivity Suite - VPN since this depends on the router settings that have already been made. If more than one WAN chain or a VPN tunnel have already been configured for example, this may cause conflicts with the configuration file. A further manual editing of the configuration is necessary then.
Due to the configuration of two update servers for the regular update of the data required for the OpenVPN connection, it can happen that errors are generated for the respective inaccessible update server of the currently disconnected instance of the icom Connectivity Suite when an attempt is made to access it. These errors cannot be avoided and can be ignored.
Troubleshooting
You can verify a successful connection when the Status of the device in the device list in the Devices menu of the icom Connectivity Suite - VPN changes to Online. Please note that this may take up to a few minutes.
If it does not get online, check the following:
Condition of the cellular connection under
 Status → Dashboard (for an LTE router)
Condition of the OpenVPN connection under
Status → DashboardOpenVPN Log in the
Status → Logs menu